Thursday, April 23, 2015

Someday soon I'll start blogging again


Until then, enjoy some random pictures from my last few months. 


One blog post on the books for 2015! Go me!

Thursday, January 23, 2014

Oh Hey There Internet...


 So, by now my vast readership has noticed that I haven't had a new blog post in a while. But, fear not! For I have still been busy. That's right, while I've been neglecting my blog I have not been neglecting my work.  And it's been a busy few months!


Since my last post, I went to my guild's retreat, I did a small craft show, I made custom sculptures for a cake topper, and I even tried my hand at a digital portrait.  And the big news this week, is I'm open for business!  I've got stock in my Etsy shop, and I'm happy with the photos.

I had been working toward this for the last few months and it feels good to finally be able to have it rolling.  I think one of my biggest obstacles, apart from what to make, was the photos.  I only have my iphone, but I think I figured out how to make it all work fairly well and I'm comfortable putting the photos I have out there.  Things are falling into place, I'm glad I decided not to rush it at the end of last year.


Friday, October 18, 2013

New Jewelry Coming Soon

Beads that make me smile

I've been waffling a bit.  I haven't been happy enough with the things I've been making to want to put them out there for sale.  The beads above might not look like much right now, but when I made them, I found I really liked them.  The little grey cells were activated and my mind has been full of ideas.  I know what I want to do now.  It's a lot more fun to think about opening up shop when I'm excited about what I'm making.  All the putzing around I've been doing for the last month has not gone to waste!

Thursday, October 10, 2013

TARDIS Construction is complete!

All that blue from my last post inspired me to sit down and finally finish my TARDIS cane.  Construction is completed! yay! Although I still need to reduce it.  I'm just going to stare at it for a little while before I do that.
TARDIS construction completed
Really though, it's a five pound cane without a background (it's not getting one for now) and all I want is one slice.  One nice big slice of the full size cane before I shrink it down, and I don't know a graceful way to do that.  I have ideas, and all of them involve a tool I need to invent and I have a feeling the desire to reduce this will come before the desire to have a big slice.

Tomorrow I have to find the scrap clay that will fill in the background so I can reduce it, and then actually reduce it, it will be an adventure.  I'll be sure to take photos.

Tuesday, October 8, 2013

Diamond Necklace and Dazzling Blue Color Recipe for Polymer Clay

Dazzling blue

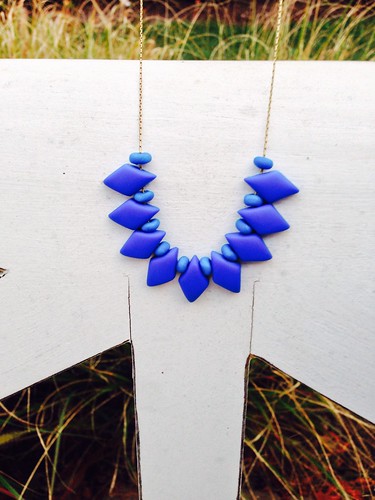
I've been enjoying working on things that are new for me lately, one thing I've never done is try to match the Pantone colors that come out every spring and fall.  I've been needing a little fresh air and thought a project like this would be just what the doctor ordered.  I never imagined my first little tutorial here would be for something that's not a cane.  When I was trying to come up with an easy project to go along with this color, none of the canes I tried were right.  It's such a pretty blue I thought it just needed to be left alone.

I feel the need to start with an acknowledgement that my pictures are... not professional.   Is that a nice way of putting it?  I've only got the camera from my iphone and the bench in my backyard to work with for now.  I also do most of my claying at night after the kids go to bed, so the lighting in the progress photos taken at my work table do leave something to be desired.  Rest assured, the color really is a dazzling blue in person.  I'm glad we got all that out in the open.  Onward and upward.

About the color recipe, I use Premo.  I really tried to come up with a mix that didn't include cobalt blue, but it just didn't work.  Cobalt blue is no longer sold in brick and mortar stores but is available from several online sources (I use Polymer Clay Express, but I know there are others).  Also, this mix is also used in the recipes I made for the next few colors for the Spring 2014 Pantone colors, so it couldn't hurt to make a bigger batch if you plan on making the rest of the colors with me.

Dazzling blue


Dazzling Blue

3 parts Ultramarine Blue
2 parts Cobalt Blue
1 part Turquoise
1/4 part White

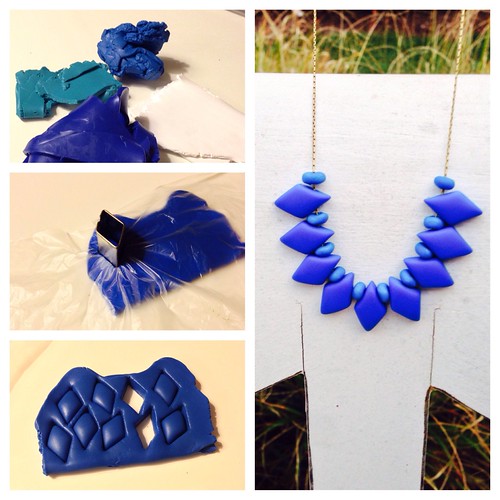
Once you have the color mixed, roll a sheet out on the thickest setting or your pasta machine.  Fold the sheet in half so you have a double layer of blue and press to make sure the layers stick together.  Use a thin piece of plastic loosely laid across the top of your clay (I used a deli sheet, but Saran wrap or even a small plastic baggie would do the trick).

Cut out your desired shape by pressing your cutter into the plastic covered clay (I used the diamond shape from the Makin's Geometric cutter set).  Using the plastic over the top will give a nice rounded shape to your piece, making the finishing easier.  After each cut, lift the plastic and place it loosely on top of the clay again before cutting your next shape.

Cut out nine diamonds (or seven, or five, however many you think will look good around your neck).  Poke holes in the top part of your diamonds using a needle tool or pin.  I like using a head pin to make a small hole first, then switching to a larger tool to get the hole up to the size I need.  I think starting smaller leads to less distortion when pushing through the bead.

Make spacer beads for your necklace with the blue clay (I added a little pearl to mine at this point, you can use any color you want).  An easy way to make consistently sized spacer beads is to roll out a snake of clay and cut at consistent intervals along the clay.  A lot of people measure, I just wing it.  Roll your pieces into balls and pierce to make a hole.

Before baking your beads, make sure that the holes you pierced will fit with the material you choose to string it with, it will save you a lot of frustration if you guessed wrong.  Also look over your diamonds and carefully smooth any edges.  Place your beads on an index card or parchment paper on a cookie sheet and bake at 275 degrees for at least 30 minutes.

To string your necklace you have a lot of options.  I chose a vintage brass beading chain with matching crimp ends and a small lobster clasp.

Thanks for reading, I hope you enjoy your new dazzling blue necklace! Here's a preview, there are more color recipes coming soon:

Pantone Spring 2014

Tuesday, October 1, 2013

New Directions

Sunflowers


I haven't been posting, but I have been productive.  I've been making pendants, bracelets, new canes and doing lots of thinking.  Most of the things I've been making haven't been what I want to be making.  I'm pretty sure a lot of artists know what I mean.  You have an idea in your head, you sit down to work and make something fabulous, and then the result is not what you pictured.

I've been wanting to open for business, but the things I've made are not the things I ultimately want to be selling and making regularly.  I think perhaps I'll post the jewelry and raw canes I've made and just keep working away.  I'm getting closer to what I want to be making, it's really just a simpler style than what I've been doing up until now.

Yellow
Soon to be sunflower petals

I've always loved playing with colors and the style I've developed over the years came from that.  Recently I discovered I'm more in love with the component canes I make to go into my bigger pictures, like the one above.  When I look at that I get more ideas than when I look at the finished sunflower.  I always thought I never finished things but maybe it's because I don't know what to do with a real finished cane.  I like the patterns and the stripes, so I'm going to follow my gut and see where it gets me.

Thursday, September 12, 2013

New Things!

Pendants and beads


I have been working on several things since last post, mostly just trying to get something finished.  I've decided I like my pendants enough to put in my Etsy shop, even though I hope to always be able to tweak and find ways to refine my work.  Now I just need to photograph and post the listings, which is also a pretty daunting task, hopefully I'll get to it today.

Blue flower progress


Next on my plate is that I want to create earrings with the few canes I have now, make some bangle bracelets, maybe a beaded bracelet.  I also have to finish a certain blue police box I started last week, it's a big project and I've been waiting for a big block of time to devote to it, that will hopefully happen this weekend, I'm looking forward to having it finished.  I was also thinking I might do a simpler TARDIS cane and make a tutorial for it.  I've never done a tutorial before but you can rest assured that it will be riveting.

Blue flower assembled


I made a new blue flower cane this week, and a red pansy cane before that (but forgot to take pictures of the process for that one, you can get a glimpse of it in the picture at the top of this post).  The finished blue flower is up there too.  I'm hoping to add a lot more to my collection of flower canes very soon.  I think I tried to not make them because I wanted to do different things for a while, but really I just love making flowers.